I have been playing a lot with Arista hardware lately, as we’re mainly using their products in our data center’s as Tor or Spine switches, but not only. We were already using a multi-layer switch (mls) the Arista 7150S-24 as an edge router . It’s quite uncommon to have this device in such a place but we needed it in order to route the smallest packets (cf my previous blog-post) at 10Gbit/s line-rate and it performed very well in this task. It performed so well that it became one of our main Internet routers.
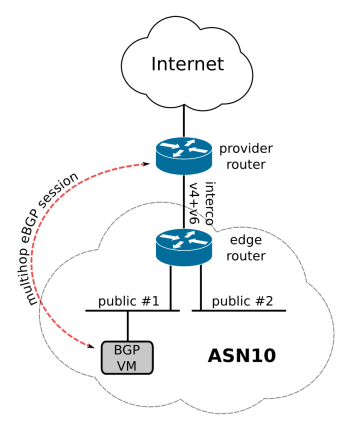
The initial setup was quite simple:
- A 10GbE interface connected to the upstream provider router.
- Interconnection subnets for IPv4 and IPv6.
- Two default gateways (v4+v6) pointing towards the IP-Transit provider router.
- Public subnets (public#1, public#2) associated to different VLANs with the mls configured as their gateways.
- IP resources announced from a VM running OpenBGPd using multi-hop eBGP sessions (v4+v6) with the provider.

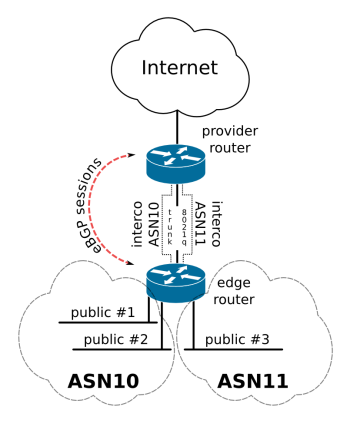
We then wanted to push things a bit further; we wanted to connect another LAB with its own ASN behind the same uplink and share the resources. The idea was to keep the Arista router for performance reasons, so this is what we had in mind:
- Create the BGP sessions directly from the edge-router instead of using multi-hop eBGP.
- Ability to store the full BGP tables for each ASN on the edge-router to push them further.
- The whole setup must be dual-stacked.
- The BGP tables should never be pushed to the switch FIB, the routing decision should only be based on few status routes for performances reasons and to bypass the hardware limitations.

I quickly faced two big problems:
- The impossibility to have multiple ASNs configured at the same time on the BGP daemon.
- The Arista 7150S-24 mls is only able to store 12’000 entries in its FIB, and there’s no way to store the tables into the RIB without pushing them in the FIB. We’re far away from the +550’000 routes for IPv4 and the +20’000 for IPv6, and this is only for one ASN.
By curiosity I tried to remove the 12’000 entries soft-limit and I sent a full BGP table to the router FIB. Believe me, you don’t want to do this. The process responsible for pushing routes into the TCAM was acting like crazy, eating all the CPU, trying desperately to push the routes into its hardware and then it decided to commit suicide after a few minutes of pure panic.
So my setup was pretty screwed after that episode… but! Remember that those switches are running on Linux, and not a stripped down version like it’s often the case with embedded hardware but a full blown x86 Fedora distribution.
I decided to replace the BGP routing engine with the awesome BIRD. If you don’t know this remarkable piece of software yet, I suggest that you have a look at its website and its features list.
The latest Arista software version at the time of this post is EOS 4.15. It’s based on a quite an old Fedora 14 version, if any Arista developers are reading this: Hey guys do something it’s getting quite old now!
The Bird packages from the Fedora 14 repositories were as old as the distribution (Bird 1.2.5 from 2010), so I decided to compile the latest stable version from the sources.
The first thing to do was to configure the Fedora 14 repo on the switch and enable it:
1. Add the following files:
/etc/yum.repos.d/fedora_updates.repo
[fedora]
name=Fedora 14 - i386
failovermethod=priority
baseurl=http://dl.fedoraproject.org/pub/archive/fedora/linux/releases/14/Everything/i386/os/
exclude=kernel,fedora-logos
enabled=1
and
/etc/yum.repos.d/fedora_updates.repo:
[fedora-updates]
name=Fedora 14 - i386
failovermethod=priority
baseurl=http://dl.fedoraproject.org/pub/archive/fedora/linux/updates/14/i386/
exclude=kernel,fedora-logos
enabled=1
2. Install Bird dependencies + compilation tools and useful stuffs:
yum install vim readline-devel ncurses-devel flex bison autoconf gcc make
3. Get latest stable release: https://github.com/BIRD/bird/archive/v1.5.0.tar.gz
4. Unpack and cd into it
5. #autoconf
6. We will have to compile Bird twice, this first time to have the IPv4 enabled daemon and then a second time to have the IPv6 one. When the compilation is finished we’ll move the compiled binary on the persistent partition of the switch, otherwise it won’t survive a reboot.
./configure
make
cp bird /mnt/flash/persist/bird
cp birdc /mnt/flash/persist/birdc
cp birdcl /mnt/flash/persist/birdcl
make clean
./configure --enable-ipv6
make
cp bird /mnt/flash/persist/bird6
cp birdc /mnt/flash/persist/birdc6
cp birdcl /mnt/flash/persist/birdcl6
Now that we’re done compiling stuff, we won’t need to clean what we downloaded or installed, the next reboot will do that for us (my 2 cents: take 60 seconds to make the vim binary persistent too, it’ll save your nerves later).
Then we will create the init script that copies the binaries from the persistent storage to the executables path and the config files, in the end it will start the two daemons.
7. Put the following into /mnt/flash/rc.eos:
#!/bin/sh
# copy the birdv4 executables and config file
cp /mnt/flash/persist/bird.conf /usr/local/etc/bird.conf
cp /mnt/flash/persist/bird      /usr/local/sbin/bird
cp /mnt/flash/persist/birdc     /usr/local/sbin/birdc
cp /mnt/flash/persist/birdcl    /usr/local/sbin/birdcl

# copy the birdv6 executables and config file
cp /mnt/flash/persist/bird6.conf /usr/local/etc/bird6.conf
cp /mnt/flash/persist/bird6      /usr/local/sbin/bird6
cp /mnt/flash/persist/birdc6     /usr/local/sbin/birdc6
cp /mnt/flash/persist/birdcl6    /usr/local/sbin/birdcl6

# create socket files
mkdir -p /usr/local/var/run/
touch    /usr/local/var/run/bird.ctl
touch    /usr/local/var/run/bird6.ctl

# start the daemons
/bin/chmod +x /usr/local/sbin/bird /usr/local/sbin/birdc /usr/local/sbin/birdcl
/bin/chmod +x /usr/local/sbin/bird6 /usr/local/sbin/birdc6 /usr/local/sbin/birdcl6
/usr/local/sbin/bird -c /usr/local/etc/bird.conf
/usr/local/sbin/bird6 -c /usr/local/etc/bird6.conf
So at this point the daemon will be started automatically during each switch startup. The last part is now the bird configuration.
Here’s my config file for IPv4, I commented the config file:
router id xxx.xxx.xxx.xxx;

protocol kernel {
    persist;
    scan time 20;
    import none;
    export none;
}

protocol device {
    scan time 10;        # Scan interfaces every 10 seconds
}

# Routes to be announced from ASN10
protocol static ASN10_routes {
    route 203.0.113.0/24 via 198.51.100.1; #198.51.100.1 is the edge-router 1st WAN IP
}
# Routes to be announced from ASN11
protocol static ASN11_routes {
    route 192.0.2.0/24 via 198.51.100.11; #198.51.100.11 is the edge-router 2nd WAN IP
}

# BGP session for ASN10
protocol bgp AS10 {
    description "eBGP AS10";
    local as 10;
    neighbor 198.51.100.2 as 12;
        export where proto = "ASN10_routes";
}

# BGP session for ASN11
protocol bgp AS11 {
    description "eBGP AS11";
    local as 11;
    neighbor 198.51.100.12 as 12;
        export where proto = "ASN11_routes";
}
I voluntarily omitted the IPv6 configuration for the sake of brevity as the concept was the same for both protocols.
Last thing we have to do, now that we have two uplinks with the upstream provider, is to configure two default gateways; one for ASN10 and one for ASN11. Wait, what what? Two default gateways? Yes we’re not talking about ECMP here but two different gateways for each ASN. This is something that is now possible with isolated routing tables, also called VRFs. Arista VRFs are using the Linux Kernel isolation mechanisms (namespaces) for routing table isolation, all we have to do is to group interfaces part of ASN10 into the same VFR and apply the default route to the VRF. Then do the same for then second VRF for ASN11.
So with this setup, when the switch starts, the BIRD daemon will establish the BGP sessions and advertise the respective routes for each ASN. So far so good. The bird daemon will store the BGP tables for each session separately without pushing them to the switch FIB, as we asked it to do. We will use it for the next step.
Let’s move a bit further, now we want to push the BGP tables to the down-stream routers, they will use those tables to make their routing decision, unlike the edge-router. BIRD allows the previously learned routes to be redistribute to any other protocol.

protocol bgp iASN10 {
        description "iBGP AS10";
        local as 10;
        neighbor 198.51.100.101 as 10;
        export where proto = "AS10;
}
protocol bgp iASN11 {
        description "iBGP AS11";
        local as 11;
        neighbor 198.51.100.111 as 11;
        export where proto = "AS11;
}
You’ve certainly noticed the pirate flag located on the public #2 in the above diagram. That’s the main ‘raison d’etre’ of this setup. This guy can push 14Mpps and fill the upstream provider pipe. As a comparison, a CISCO ASR9K is able to route 7Mpps, that’s half of what we can expect, using 10GbE and we’re talking about carrier-grade routers. So we didn’t want to put it behind routers having to perform lookups in large routing tables.
Last but not least, for our final setup to be redundant we will:
- Add another IP-Transit provider
- Put the same tweaked Arista router on the edge of our network
- Start announcing our resources to the second provider
- Create the iBGP sessions with the downstream routers; now they will be able to choose the best routes
Notes / conclusion
- Moving the “real” BGP routers from the edge of our network to a lower layer and leaving dumb-but-powerful multi-layer switches in front of them, allowed us to leverage the physical limitations of these routers. It created a kind of cheap pps-DMZ in front of the routing-decision-taking-routers.
- Replacing the BGP routing engine will remove the ability to push BGP learned routes into the ASICS switch, at least I haven’t invested time in that, it might be doable.
- I also tried to replace the OSPF engines using BIRD but this time I wanted to push OSPF learned routes into the switch hardware, so I kept the Arista official engine.
- Replacing the Arista switches with cheaper mls like cumulus-linux-ready switches is definitely an interesting direction we should explore.
References
Arista 7150S-24 product page
Arista Networks
BIRD software
Cumulus Linux
ECMP
Fedora Linux
Linux Kernel namespaces
Previous blog-post about Arista hardwareVRFs


Great guide!
If I could offer a suggestion, repacking the bird binary into a SWIX is the “proper” Arista way and will allow for simpler portability and persistence.
I did find that it was necessary to bind mount /usr, /bin and /var/cache/yum to a USB disk to avoid filling the root fs during compile. I used VEOS to make the package, so a production switch didn’t get borked!
Install Checkinstall
~~~~
yum isntall gettext rpmdevtools file
cd /usr/src
wget http://linuxnotes.us/download/checkinstall-1.6.2-2.tar.gz
tar xvfz checkinstall-1.6.2-2.tar.gz
cd checkinstall*
make install
cp /usr/local/bin/installwatch /bin
rpmdev-setuptree
~~~~
Compiling BIRD from source
~~~~
yum install readline-devel ncurses-devel flex bison autoconf gcc make
cd /usr/src
wget https://github.com/BIRD/bird/archive/master.zip -O master.zip
unzip master.zip
cd bird-master
autoconf
./configure –prefix=/mnt/flash/bird
make
make install
~~~~
Then make the BIRD RPM/SWIX
~~~~
checkinstall
mkdir -p /mnt/sdb1/downloads/bird
cp /root/rpmbuild/RPMS/x86_64/bird*i686.rpm /mnt/sdb1/downloads/bird
cd /mnt/sdb1/downloads/bird
~~~~
Create the manifest file
~~~~
cd /mnt/sdb1/downloads/bird
cat > manifest.txt <> manifest.txt
done
~~~~
Create the SWIX
swix create bird-1.6.0.swix *.rpm
Load the SWIX and set it to run on boot
~~~~
copy file:/mnt/sdb1/downloads/bird/bird-1.6.0.swix extension:
extension bird-1.6.0.swix
copy installed-extensions boot-extensions
~~~~
Actually, to update my last post, I went one better.
I documented the lot here, https://github.com/choco-loo/arista-bird