This article was inspired by a previous post on my personal blog: https://www.freeture.ch/?p=815
Intro
OpenSSH is a great tool, everybody knows that (even Microsoft). It’s commonly used to securely take control or copy a bunch of files to or from remote machines. Another common scenario is to have a machine between two networks that acts as a gateway or “jump-host” between those networks; you connect to this machine and from there you open another connection to the other network. Something annoying is when you want to transfer files between the two networks, you’ll have to copy the files two times, once from the source to the gateway and then from the gateway to the destination. So if your files are huge, it means having disk space available on the jump-host and if you do so frequently it’s a headache; and everybody knows that sysadmins are lazy guys.
This tutorial will explain how to copy files from the source to the target directly and vice-versa.
Big-picture
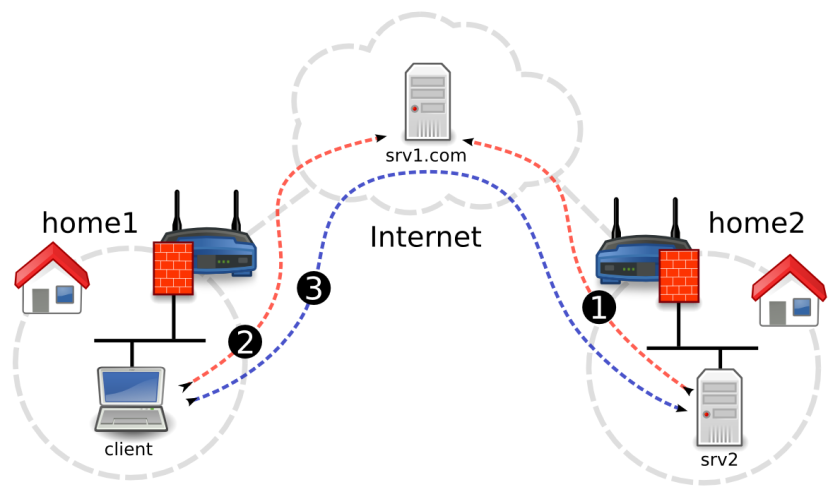
In my example, target server (srv2) is behind a firewalled + NATed connection at home2 and we have no access to the router, so we can’t configure port-forwarding. Outbound connection is not filtered though, so we will initiate a reverse-tunnel to join the jump-host (srv1.com) so connection can then be initiated from srv1.com to srv2 through that persistent tunnel. Then we will configure the client machine located at home1 to access srv2 through srv1.com reverse-tunnel. We will finish with a bunch of example on how to transfer files between the client and srv2. The whole setup will use public key authentication instead of static passwords.
config
Step 1: Let’s start srv2 and srv1.com reverse-tunnel configuration:
1.1 Create a private/public ssh key-pair on srv2:
$ ssh-keygen -t rsa -b 4096
1.2: Copy srv2 public-key in srv1.com /home/myuser/.ssh/authorized_keys file
1.3: Try to connect from srv2 to srv1.com, you should obtain a shell without entering a password
$ ssh [email protected]
1.4: Open again /home/myuser/.ssh/authorized_keys on srv1.com and add the following options before srv2 public key:
command="/bin/false",no-agent-forwarding,no-pty,no-user-rc,no-X11-forwarding
The whole file will looks something like this
command="/bin/false",no-agent-forwarding,no-pty,no-user-rc,no-X11-forwarding ssh-rsa AAAAB3NzaC1yc2EAAAADAQABAAACAQC5TBa86GUdvTdTuK5nLEaIFVp2zTwxWD+NLG3EfrCRoCA/iaRVM2lF/FyeOdQ2WfMcg4AzpxVy6GTpRWAYzO2uZKSmk+wMxLqU5k5nrOOrBRuwIWXmbTVhDCJX+A9RMG+BL7nOrwNeg2niuow5tiGUi+HMTh9NIPDiP9e36jOWQL2lTDtJ1wXFfR+zPoiCR9bCEphfioseVJSFEzj1pDLc8IQvoLrCcbSBoy16sKPxRfuP2dSmB3jU6tNMS6r79RC4CYJ5iYjBNU8TBtjsAvrskDqSD9vRlAR2lD6o0jSqKowm1AaX7bkUvM7RbJCniDsUFj6Erz2SxsXsVC3FOsP6sZyLuiggJBiVoQ7Fp4YHJyNsBSzoEIsTNxAwGaQIB5fYQ6ZlEmW+tPnC1vrzZDUj5s90nkldFFP3g4V1NkcXTLWTrjBkU8e8s6IBTpJcCELaLTZzQ9hXEjlR6zuJslPwXaXyMoEANGHWNAoJvj1ldk9h4+sUws4DluuUO1LKbDmjQ9+hC+ylR7nYYCkzCkSsQoHJS3ZFeZWkDC3ZTLrTtG5oPi+zYGb7j+BEFfaSL1CAz7n0Ai87ruN7Rf6CpMtjJsO2aCFxwSZ0sRFfXUd9RJdXzDBGOC6IIcbUDcwOWAL2vrYiiehloG7HMQ+2Xup5ddIXV5yBtQ== myuser@srv2
This will harden a bit the connection from srv to srv1.com (no shell, no X11 forwarding, …), more info about it here or here
1.5: We will create a script that keeps the reverse-tunnel opened on srv2, copy the following script on srv2 homedir (call it callhome.sh) and make it executable:
#!/bin/bash
process=$(pidof ssh)
if [[ $process == “” ]] ; then
ssh -TNnR 19999:localhost:22 [email protected];
fi
1.6: Insert the following crontab entry on srv2
*/1 * * * * /home/user/callhome.sh
1.7: Connect to srv1.com, the tunnel should have been opened, you can check that with the following command:
# netstat -tulpn | grep 19999

tcp 0 0 127.0.0.1:19999 0.0.0.0:* LISTEN 25261/sshd:

tcp6 0 0 ::1:19999 :::* LISTEN 25261/sshd:
In this example we can see that the reverse tunnel has created two sockets 128.0.0.1:19999 and ::1:19999. We should now be able to connect to srv2 through it.
$ ssh [email protected]:19999
You’ll need to supply the password for myuser, as we haven’t yet configured pubkey authentication in these instructions. We will do that now.
Step 2: Pubkey authentication from srv1.com to srv2:
2.1: Create a private/public ssh key-pair on srv1.com:
$ ssh-keygen -t rsa -b 4096
2.2: Copy srv1.com public-key in srv2 /home/myuser/.ssh/authorized_keys file
2.3: You should now be able to connect using pubkey authentication from srv1.com to srv2 through the reverse-tunnel established from srv2 to srv1.com, pfew ! Just try the above command again and this time you should obtain the shell directly.
2.4: Like previously we will harden a bit the authentication mechanism; add the following before the key in /home/myuser/.ssh/authorized_keys file
command="/bin/false",no-agent-forwarding,no-pty,no-user-rc,no-X11-forwarding
2.5: Great the hardest part is done, we will now work on the machine located at home1.
Create a private/public ssh key-pair on the client, we’re kinda used to it… :)
$ ssh-keygen -t rsa -b 4096
2.6: Copy the client public key in /home/myuser/.ssh/authorized_keys on srv1.com
This time we will add the following option line before the public-key
command="/bin/nc",no-agent-forwarding,no-pty,no-user-rc,no-X11-forwarding
2.7: Create the following file in your user home dir ~/.ssh/config
Host srv2

ProxyCommand ssh [email protected] nc 127.0.0.1 19999
So basically when we connect to host `srv2` from the client machine the connection will be initiated to `srv1.com` with user `myuser` then `nc` will be used to open the connection through the reverse-tunnel. What’s very cool with this mechanism is that it’s transparent to the application that connects to the remote host.
Few examples
If your setup was made correctly you shouldn’t be prompted for a password:
connect to srv2:
$ ssh myuser@srv2
copy something to srv2
$ scp myfile myuser@srv2:
scp is very handy to copy a file or a directory but it lacks features. For example if you want to make your backups to or from srv2 rsync will be much more suited (resume failed transfers, match files using complex filters, recursively crawl remote directories, …), so here’s how it can be used:
rsync -avz -e "ssh -o StrictHostKeyChecking=no" --progress myuser@srv2:source_dir dest_dir/
notes
Gentoo doc, SSH jump host
OpenSSH man page
OpenSSH Client Configuration Files
Restrict SSH logins to a single command
Rsync homepage
Scp or rsync with a jump host between the source and the destination
Hope you enjoyed it,
+++
Romain


great article.
so if i copy files from home1 to home2 with rsync I must have the ser1.com active. But I wonder if it could be possible to copy files directly without using serv1.com, to avoid using its bandwith ?
Thanks in advance
thanks for this great article.
I understand serv1.com is necessary to establish the link between home1 and home2. But once the connextion is established, is it possible to communicate between home1 and home2 directy to avoid using serv1.com bandwith ?
regards