

I enthusiastically use two-factor authentication whenever possible because static passwords aren’t the best mechanism to mitigate risk… Traditional passwords are vulnerable to social engineering, key-loggers, malwares and—especially as computers become ever faster—to cracking. With many popular websites providing two-factor authentication (TFA, T-FA or 2FA), why shouldn’t you add two-factor authentication to OpenSSH that run on the Cloud infrastructure? Public-key, Private-key authentication is generally considered to be very secure, but why not take an extra step?
This article describes how to use a One Time Password (OTP) based on the OATH open standard. We will use as an example a TOTP (Time-based One-time Password Algorithm like SecurID – RFC 6238) software token on a smartphone.
Note:
To improve security you can use a hardware OTP token supporting OATH (See OATH Certified Products)!

Preamble
To integrate two-factor authentication within OpenSSH, we will use several components:
- A pluggable authentication module (PAM)
- The multiOTP module – A strong authentication class in pure PHP, OATH certified
- A FreeRADIUS local server
- A OATH Android software token
Note:
From my point of view it is the most thorough approach. You can use your OTP server for others application. But this approach is NOT the only one. There are other approaches such as:
- Using the google-authenticator PAM Module and/or the Google authenticator software OTP
- Using the OATH Toolkit with PAM
- And maybe other approaches?
multiOTP installation
This chapter will explain how to install multiOTP on your system and how to create a OTP for a user.
- #1: Get and install multiOTP
For this article we will use multiOTP version 4.1.0 (2013-12-23)
[sma]# wget "http://download.multiotp.net/4.x/multiotp-4.1.0.zip"
- #2: Create a directory in /usr/local called multiotp
[sma]# mkdir /usr/local/multiotp
- #3: Copy the multiOTP module to this new directory
[sma]# cp multiotp-4.1.0.zip /usr/local/multiotp
- #4: Decompress this file
[sma]# cd /usr/local/multiotp/
[sma]# unzip multiotp-4.1.0.zip
You are now ready to use multiOTP!
Note:
- Be sure you have PHP installed on your system and all PHP Libraries needed by multiOTP (GD2 for generating the QRCode).
- Be sure your system is time-synchronized. We will use a time-based OTP token based on the UTC clock.
- Be sure your smartphone is also time-syncronized
Create an OTP token for a user
Create a user and assign an OTP token. As example, we will create a user (identity) called “sma”.
Note: 2FA parameters
- 6 digits OTP display
- OTP change time [T] = every 60 sec
- OTP (First authN factor) = 6 digits changing every 60 secondes
- Pincode (Second authN factor) = 4-8 digits
- Passcode = Pincode + OTP
- HMAC [K] = type HMAC-SHA-1 – 160 bits (Most of the token implementation use this SHA-1 at the moment! TOTP support SHA-256 and SHA-512. HTOP only SHA-1)
- Secret key aka Seed = Pseudo Random number 160-bit
- #1: Generate a ramdom Seed [K] for the user (160 bits)
[sma]# openssl rand 20 -hex -out sma-seed.txt
- #2: Create the OTP token for the user
We are now ready to use multiOTP command line! To check all parameters type this command:
[sma]# ./multiotp.php
or
[sma]# /usr/bin/php ./multiotp.php
Display the random Seed [K] (Keep it really secret :- Remenber RSA SecurID APT in 2011 !). Do not forget to delete the clear text file containing the seed. You can encrypt this file if you want to have a backup or just delete it!
[sma]# cat sma-seed.txt
65BFF143E399795381AA4D145089657B23A95BE4
Create the token with this Seed [K] (HEX = 65BFF143E399795381AA4D145089657B23A95BE4), PinCode = 3102, 6 digits and changing every 60 secondes:
[sma]# ./multiotp.php -create -prefix-pin sma TOTP 65BFF143E399795381AA4D145089657B23A95BE4 3102 6 60
Check the return code. It should be 11 (INFO: User successfully created or updated).
[sma]# echo $?
11
- #3: Sofware token provisioning
Note:
- You should keep the Seed [K] secret when generating and provisioning the token software. Think about Out ouf Band, SSL/TLS, SMS, Push, OTA, SOAP, REST WS, etc. as a secure provisioning mechanism.
- To transfer the Seed (Provisioning) for the user “sma” you will generate a QRCode with this command (Code 16 INFO: QRcode successfully created):
[sma]# ./multiotp.php -display-log -debug -qrcode sma sma-seed.png
16 INFO: QRcode successfully created
With your OTP software token scan the QRCode in order to import the secret Seed [K].

Secret QRCode 160 bits For this post we will use the App Android Token (as a proof of concept guide).
In terms of portability I recommend to use the Google Authenticator App!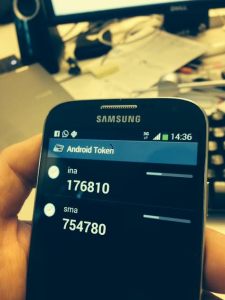
Android OTP Token In order to ajust the time between the software soft token and multiOTP server we recomand to perform a resync action (two consecutive PassCode – 577138=first OTP; wait 60sec; 125372=second OTP) an then test your token.
[sma]# ./multiotp.php -resync -status sma 3102577138 3102125372
[===============================] 100%  3/3000
And now test your Token (Wait for the next OTP).
[sma]# ./multiotp.php sma 3102810599
[sma]# echo $?
0
0 = OK: Token accepted
You are now ready to integrate MultiOTP with FreeRadius!Integrate MultiOTP with FreeRadius
- #1: Install FreeRadius on your linux server. As example with CentOS:
[sma]# yum install freeradius freeradius-utils
- #2: Configure FreeRadius with multiOTP
[1] Create a new module file called “multiotp” in etc/raddb/modules/ containing:
# Exec module instance for multiOTP.
# for Linux : replace ‘/path/to’ with the actual path to the multiotp.php file.exec multiotp { wait = yes input_pairs = request output_pairs = reply program = "/path/to/multiotp.php %{User-Name} %{User-Password} -chap-challenge=%{CHAP-Challenge} -chap-password=%{CHAP-Password}" shell_escape = yes }[2] In the configuration file called “default” in etc/raddb/sites-enabled/
a) Add the multiOTP handling
#
# Handle multiOTP authentication.
# This must be add BEFORE the first “pap” entry found in the file.multiotp
b) Add the multiOTP authentication handling
#
# Handle multiOTP authentication.
# This must be add BEFORE the first “Auth-Type PAP” entry found in the file.Auth-Type multiotp { multiotp }c) Comment the first line containing only “chap”
#chap is now handled by multiOTP[3] In the configuration file called “inner-tunnel” in etc/raddb/sites-enabled/
a) Add the multiOTP handling
#
# Handle multiOTP authentication.
# This must be add BEFORE the first “pap” entry found in the file.multiotp
b) Add the multiOTP authentication handling
#
# Handle multiOTP authentication.
# This must be add BEFORE the first “Auth-Type PAP” entry found in the file.Auth-Type multiotp { multiotp }c) Comment the first line containing only “chap”
#chap is now handled by multiOTP[4] In the configuration file called “policy.conf” in etc/raddb/
a) Add the multiOTP authorization policy
#
# Handle multiOTP authorization policy.
# This must be add just before the last “}”multiotp.authorize { if (!control:Auth-Type) { update control { Auth-Type := multiotp } } }[5] In the configuration file called “radiusd.conf” in etc/raddb/
a) Depending to which port(s) and/or ip address(es) you want to listen, change
the corresponding ipaddr and port parameters. 127.0.0.1 if you need only a local Radius server![6] In the configuration file called “clients.conf” in etc/raddb/
a) Add the clients IP, mask and secret that you want to authorize.
#
# Handle multiOTP for some clients. In your case 127.0.0.1 (for local usage). Choose a Radius Secret. As example for this post=Gtz670_$-yxaca0kut!client 127.0.0.1 { netmask = 32 secret = Gtz670_$-yxaca0kut }- #3: Test FreeRadius with multiOTP
Now, to see what’s going on, you can:
– stop the service :[sma]# /etc/init.d/freeradius stop
– launch the FreeRADIUS server in debug mode :
[sma]# /usr/sbin/freeradius -X
– try to make some authentication requests with radtest:
[sma]# radtest sma 3102325717 127.0.0.1 1812 Gtz670_$-yxaca0kut
Sending Access-Request of id 14 to 127.0.0.1 port 1812
        User-Name = "sma"
        User-Password = "3102657405"
        NAS-IP-Address = 127.0.0.1
        NAS-Port = 1812
        Message-Authenticator = 0x00000000000000000000000000000000
rad_recv: Access-Accept packet from host 127.0.0.1 port 1812, id=14, length=20
You are now ready to integrate FreeRadius with your OpenSSH via a PAM agent! Good job :-)
Configure OpenSSH and PAM
The next step is to configure your OpenSSH server to request the PassCode (PinCode+OTP) to the radius server. For this purpose we will use a radius PAM agent.
- #1: PAM configuration for OpenSSH server:
Edit the file /etc/pam.d/sshd with this configuration. Comment the username/password line and add the PAM library. Be sure you have the PAM radius library.
#auth required pam_stack.so service=system-auth
auth required /lib/security/pam_radius_auth.so
Specify the Radius Server (in this case localhost – 127.0.0.1). Create and edit a file called server in /etc/raddb with the Radius IP,port and the shared secret key.
#Server[:port]  shared_secret      timeout (s)
127.0.0.1             Gtz670_$-yxaca0kut   1
#other-server    other-secret       3
- #2: OpenSSH server (radiusd daemon) configuration:
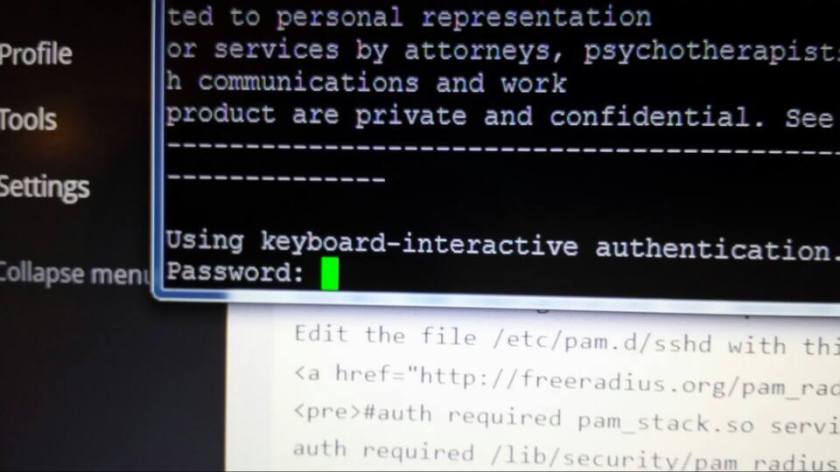
Edit /etc/sshd/sshd_config and be sure PAM is enabled and keyboard-interactive AuthN support.
UsePAM yes
PasswordAuthentication no
ChallengeResponseAuthentication yes
Stop and start the OpenSSH server
[sma]# /etc/init.d/sshd stop
[sma]# /etc/init.d/sshd start
You are now ready to test your login SSH with an software OTP :-)
Login SSH with OTP AuhN …and if you want more security (!)…
Apply a hardenig procedure. Read this post: OpenSSH hardening for cloud machine – part 1 / November 28, 2013
Thanks to Jean-Philippe Aumasson for his help.
Thanks for Sébastien Andrivet for review and exchanging ideas.
Thanks to André Liechti, Author for MultiOTP, for his help, review, debugging and exchanging ideas.== Appendices ==
- #1:TOTP Time-Based One-Time Password Algorithm / Background
As defined in [RFC4226], the HOTP algorithm is based on the HMAC-SHA-1 algorithm (as specified in [RFC2104]) and applied to an increasing counter value representing the message in the HMAC computation. Basically, the output of the HMAC-SHA-1 calculation is truncated to obtain user-friendly values:
HOTP(K,C) = Truncate(HMAC-SHA-1(K,C))
where Truncate represents the function that can convert an HMAC-SHA-1 value into an HOTP value. K and C represent the shared secret (Seed) and counter value.
TOTP is the time-based variant of this algorithm, where a value T, derived from a time reference and a time step, replaces the counter C in the HOTP computation.
TOTP implementations MAY use HMAC-SHA-256 or HMAC-SHA-512 functions, based on SHA-256 or SHA-512 [SHA2] hash functions, instead of the HMAC-SHA-1 function that has been specified for the HOTP computation in [RFC4226].
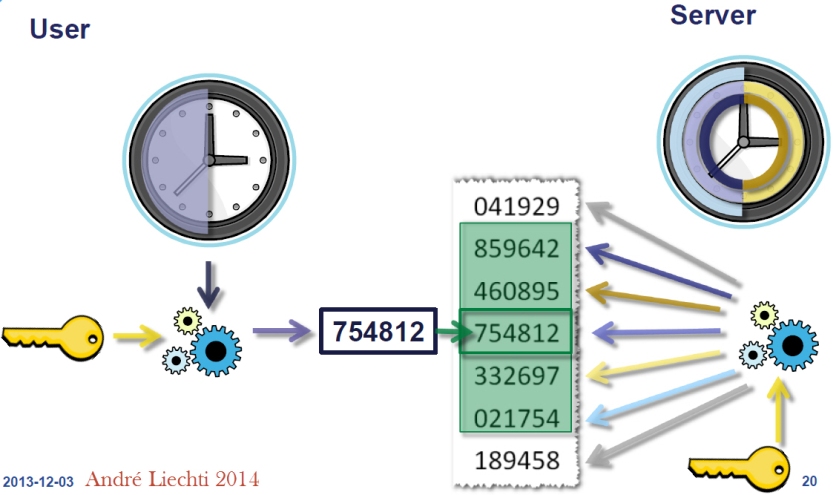
TOTP authentication mechanism So TOTP(K,T) = Truncate(HMAC-SHA-1 or HMAC-SHA-256 or HMAC-SHA-512(K,T))
- #2: Pseudorandom and random number generations
We RECOMMEND following the recommendations in [RFC4086] for all pseudorandom and random number generations. The pseudorandom numbers used for generating the keys SHOULD successfully pass the randomness test specified in [CN], or a similar well-recognized test.
You will find more information here:
- random number generation – NIST
- Cryptography Coding Standard – Use strong randomness
- Here is some example to Generate random number:# get N random bytes with openssl in base64 (or -hex for hex) in “outfile” (stdout by default)
$ openssl rand N -base64 -out outfile
# get N=nbbytes*nbblocks random bytes using dd and copy to file “outfile”
$ dd if=/dev/urandom of=outfile bs=nbbytes count=nbblocks
# get random integers using od, as a sorted list of integers mod 159
$ for i in {1..11}; do echo "`od -vAn -N4 -tu4 < /dev/urandom` % 159" | bc; done | sort -n- #3: DFD for this configuration
This DFD diagram show the dataflow and component for this configuration.
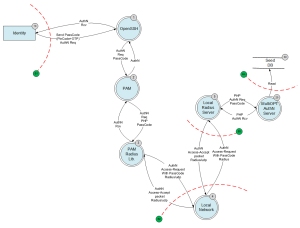
DFD


- #4: Using Google Authenticator software Token
If you want use Google Authenticator take this in consideration.
- Google Authenticator base32_seed tokens must be of n*8 characters.
- Google Authenticator TOTP tokens must have a 30 seconds interval.
- Available characters in base32 are only ABCDEFGHIJKLMNOPQRSTUVWXYZ234567
Generate a seed:
[sma]# ./multiotp.php –fastcreate sma 3102
This command will generate a unique seed (160 bits) in time-based mode (TOTP) changing every 30 secondes with a Pincode 3102.

With multiOTP, your PIN code can also be a long alphanumerical password like “ThisIsALongNonDigitPinCode!” (to answer the good @thorsheim ‘s question).